Mastering the Easter Lantern 3D Lantern Shadow Lamp for Laser Cutting Success
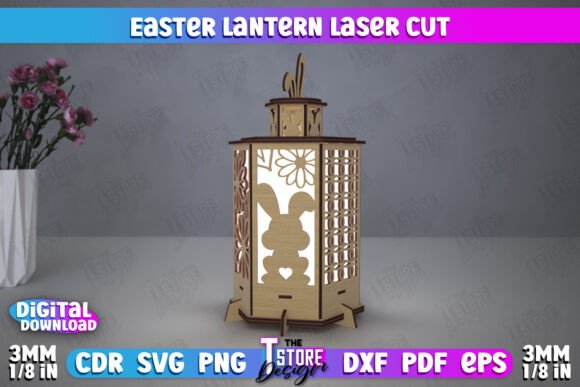
The arrival of spring brings a surge of creativity, and few projects capture the seasonal spirit quite like the Easter Lantern 3D Lantern Shadow Lamp. This intricate design transforms flat sheets of wood or acrylic into stunning three-dimensional light displays. For laser cutting enthusiasts, hobbyists, and small business owners, this project represents more than just a holiday decoration; it is a testament to precision engineering and artistic vision. However, achieving a flawless result requires more than just hitting the "start" button on your machine. Many creators rush into production without fully understanding the technical nuances of the digital files, leading to wasted materials and frustration.
Understanding the specific requirements of the Easter Lantern 3D Lantern Shadow Lamp Desktop Lamp Easter Design CNC File is crucial for anyone looking to produce high-quality pieces. Whether you are a beginner setting up your first workshop or a seasoned professional optimizing your workflow, recognizing common pitfalls can save you time, money, and effort. This guide explores the critical details often overlooked when working with these complex designs and provides actionable advice to ensure your final product shines as brightly as intended.
The Importance of File Compatibility and Format Selection
One of the most frequent mistakes makers make is assuming that all vector file formats behave identically across different software platforms. The digital package for this lantern typically includes a zip archive containing SVG, EPS, PNG, PDF, and DXF files. While this variety offers flexibility, it also introduces potential compatibility issues if not handled correctly. A common misconception is that the SVG format is universally superior because it is web-friendly. In reality, SVG files can sometimes interpret dimensions differently depending on the software used to open them.
For users operating with Lightburn, a popular laser control software, this distinction is vital. Lightburn may occasionally distort the dimensions of files, particularly when importing SVG formats. This distortion might seem minor at first glance, but in a multi-layered 3D assembly like the Easter lantern, even a fraction of a millimeter discrepancy can prevent pieces from fitting together properly. The result is a loose structure that fails to hold its shape or requires excessive adhesive to secure, compromising the clean aesthetic of the shadow lamp.
To avoid this issue, it is strongly recommended to use the DXF file format when working with Lightburn. DXF files tend to maintain strict dimensional accuracy, ensuring that every cut line and engraving path aligns perfectly with the designer’s intent. By selecting the correct file type from the start, you eliminate a significant variable that could otherwise derail your project. Always verify the scale of your design in the software before sending it to the laser cutter, regardless of the file format chosen.
Decoding Cut and Engrave Lines for Precision
Another area where errors frequently occur is in the interpretation of the vector lines within the design file. The Easter Lantern 3D Lantern Shadow Lamp relies on a precise combination of cuts and engravings to create its depth and visual appeal. The design instructions specify that RED lines indicate where the machine should cut through the material, while BLACK lines denote areas to be engraved. Ignoring this color-coding system or failing to configure your laser settings accordingly can lead to catastrophic results.
If you mistakenly set the machine to engrave the red lines instead of cutting them, the structural components will remain attached to the main sheet, making separation impossible without damaging the delicate details. Conversely, if you attempt to cut along the black engraving lines, you may weaken the structural integrity of the lantern panels or create unsightly gaps in the decorative patterns. These errors not only ruin the immediate project but also waste valuable material and machine time.
Before beginning the job, take a moment to review the layer settings in your laser software. Assign distinct power and speed parameters to the red and black layers. Typically, cutting requires higher power and slower speeds, while engraving uses lower power and faster speeds. Running a small test piece on scrap material can help confirm that your settings are accurate. This simple step ensures that the cuts are clean and the engravings are crisp, resulting in a professional-quality finish.
Material Selection and Assembly Considerations
The choice of material plays a pivotal role in the success of the Easter Lantern 3D Lantern Shadow Lamp. While the design is optimized for laser cutting, not all materials react the same way to heat and light. Thin plywood is a popular choice for its warmth and natural grain, which enhances the shadow effect when illuminated. However, using wood that is too thick can make folding and assembling the 3D structure difficult, while wood that is too thin may lack the necessary rigidity.
Acrylic is another viable option, offering a modern, sleek look with vibrant color possibilities. When using acrylic, ensure that the material is cast rather than extruded, as cast acrylic tends to produce cleaner edges and less odor during the cutting process. Regardless of the material, check for warping or imperfections before loading it into the machine. A warped sheet can cause focus issues, leading to uneven cuts and incomplete engravings.
Assembly is the final stage where attention to detail pays off. The 3D nature of the lantern means that multiple layers must align perfectly. Take your time during this phase, dry-fitting the pieces before applying any adhesive. If you find that the parts do not fit snugly, revisit your file scaling and machine calibration rather than forcing the pieces together. Patience during assembly ensures that the lantern stands sturdy and displays the intricate shadows effectively.
Maximizing Value Through Customization and Support
While the provided files are designed to work seamlessly out of the box, there may be instances where customization is desired. Perhaps you need a different size to fit a specific space, or you require a PNG file in a different color for marketing purposes. The creator of the Easter Lantern 3D Lantern Shadow Lamp Desktop Lamp Easter Design CNC File encourages communication, inviting users to reach out if they need alternative file types or adjustments. This level of support is invaluable, especially for entrepreneurs looking to tailor products for their customers.
Do not hesitate to send a message if you have questions about file compatibility or design modifications. Engaging with the designer can provide insights that are not immediately apparent from the documentation alone. Additionally, following the shop allows you to stay updated on future releases, ensuring that you have access to new and innovative designs as they become available. This ongoing connection fosters a community of creators who share tips, tricks, and inspiration.
In conclusion, creating the Easter Lantern 3D Lantern Shadow Lamp is a rewarding experience that blends technology with artistry. By paying attention to file formats, respecting the cut and engrave guidelines, selecting appropriate materials, and leveraging available support, you can avoid common pitfalls and achieve exceptional results. Whether you are crafting for personal enjoyment or commercial sale, these practices will enhance the quality of your work and elevate your reputation as a skilled maker. Embrace the process, learn from each project, and let your creativity shine through every intricate cut and shadow.